9.29.2013

Bedroom Update


Lately, life has been slow in the home-improvements department of chateau Jen&Tim. A lot of projects have been started, but nothing is finished. It's one of those seasons where other priorities are... well priorities. So while I'd usually wait until there is more of something to show you, I thought I would just jump in and share a little of the progress we've made in decorating our master bedroom...

Here are two before pictures to get you oriented :)


Since then we've added a huge brass bed, moved the orange living room rug upstairs...


... bought some plants, and got cute little nightstands off of craigslist. They were about $120 for the pair, which is more than I usually spend on craigslist, BUT our bed is unusually tall. Do you know how hard it is to find matching, cute, affordable nightstands that are more than 27 inches tall?? Hard my friends.

Search word Tips for Nightstands on craigslist: "nightstand | nightstands | night stand | night stands | end table | end tables | side table | side tables". So many terms that basically mean the SAME THING.

As you can see, I've also tested out a swatch of navy blue paint for the walls. I'm sold on the color, but painting day hasn't made its way around yet :)


To add more functionality to Tim's closet, we moved a cute little wicker dresser inside ($50 from craigslist). So what if it's from a set of furniture for little girls? No one has to know ;)


Next steps are painting, curtains, finding the perfect duvet cover, and bringing all the little details together.


So what do you think? Is it a room you'd sleep in? Is one of your rooms stuck in slow-motion-progress?

9.01.2013

What to Recycle Free Download


This past new year's day my resolution was to learn how to have a smaller impact on the environment. Since then, I've figured some stuff out that involves adjusting the items I buy and a worm farm (oh yes, a worm farm), so today I decided to get off my virtual butt and post about one area of progress - recycling.

Tim and I are adjusting our habits by recycling and trying to buy products packaged in recyclable materials. We sort of knew what we could recycle, but couldn't always keep track... The city I live in has a helpful chart, but it's not very attractive. Since all of my experience tells me it's way easier to use/love/engage with something beautiful in my home, I decided to make my own chart!


I made in in photoshop using a bamboo wacom tablet and Bebas font. Now it hangs right above our trashcan using the same method of hanging as our shark print. Love.

This little poster lists all of the things you can recycle and what you need to throw away. It especially helps Tim and I remember which numbered plastics we can recycle. It doesn't include a list of what can be composted (or worm composted), but you can bet your bet your reusable water bottle that I'll be bringing one of those to insideways soon :)

WARNING: your city might have different recycling regulations, so check before you follow this list.


Our handy dandy trashcan has two bins inside, one for trash and one for recycling. The recycling bin is smaller than the trash one, but I'm hoping we can switch their uses in the near future. Did you know that San Francisco recycles/composts 80% of its waste and Sweden is so waste efficient that they're buying other countrys' garbage?


So let's get down to business, do you want one? Click the link below (or right click and save it) to download a poster for yourself:


Printing Instructions: Color print this on 11x17 paper then cut off the excess white space. The resulting poster will be 8.5x14 ish. I had mine printed at Staples and it was super easy :)

Enjoy!!

Sources: Watercolor Textures from Evil Widgets | Fonts hand-drawn on a Wacom Bamboo Tablet or Bebas Font by Flat-It | Designed in Photoshop CS5

8.20.2013

Summer Swims


On a lark, I put together a little video of Tim and I snorkeling off the coast in Maui. As usual, the video took a lot longer to make than I thought, but I love how it turned out. Let's be honest, if I don't make the footage cute, I never look at it again :P

We took the video with a rented underwater point and shoot and I used iMovie to stitch 'er all together. Music by Cimrya Deal - Octopus's Garden. Last vacation post - promise! xox

8.19.2013

Maui Vacation


Last week Tim and I treated ourselves to an amazing vacation in Hawaii. It's definitely as beautiful as they say and we had an amazing time.


Snorkeling was probably my favorite activity, even though I burned myself HORRIBLY on the very first day. Wear sunscreen kids, and for god sake reapply.


Second best or maybe even tied for very best activity was the Road to Hana. It's a whole day adventure and I highly recommend buying the accompanying CD from the lady at the Shell Station nearby. Also, if you're someone who suffers from car sickness (*points to self*) you should drive. This road is not for the faint of stomach.


Because we're those kinds of tourists (no shame), we went to the The Feast at Lele Lu'au. It was SO FUN and there was a fire eater for the big finale!! The booze is included, which never hurts ;)


There are several things I'm super happy I got/brought, so if you're planning a beachy vacation take note:


Mostly we just did whatever we wanted because vacations are supposed to be relaxing (see Tim? I'm learning). What are your favorite vacation bring-alongs?

8.14.2013

Martha Stewart Inspired Friendship Keyring


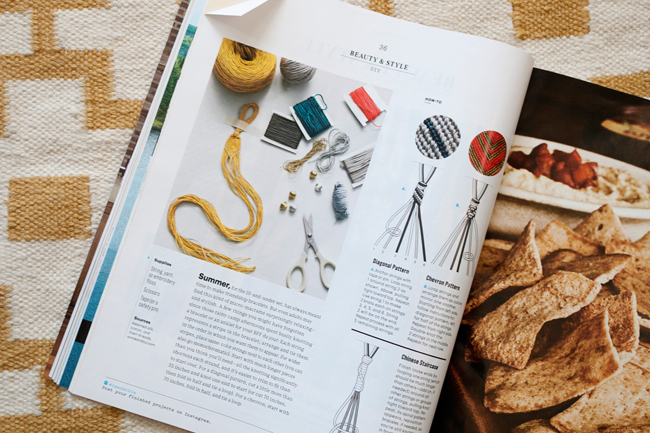
Last week the kind people at Martha Stewart sent me a copy of the July/August Martha Stewart Living Magazine. It is PACKED with inspiration! One feature in particular caught my eye - an updated take on friendship bracelets.

I'm totally one of those girls who made friendship bracelets for all. of. her. friends. That's probably why I was so cool in elementary school (read not cool, but very crafty).


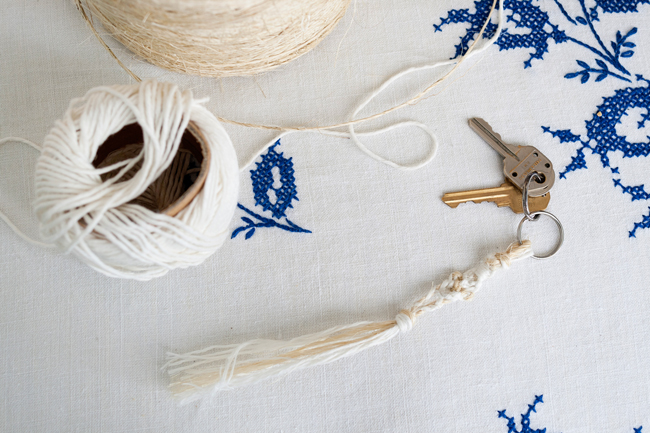
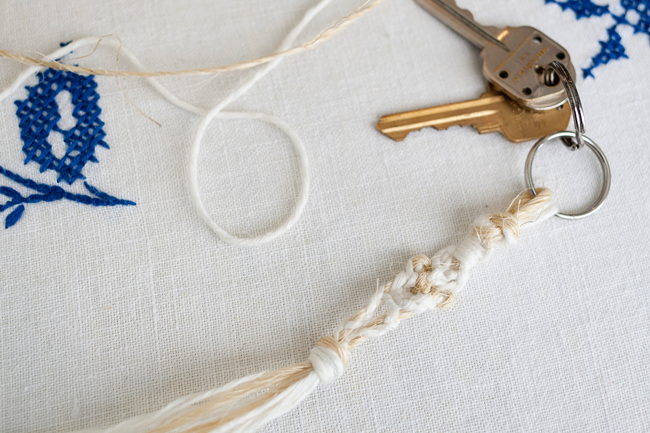
I decided to use my friendship bracelet skills enthusiasm to make a friendship keyring. I started with three 80 inch strands folded in half around the key ring - two cotton strands and one straw twine. I chose the mix of cotton and straw because I liked how the fibers looked together, but if I had to do it again, I would choose strands of the same stiffness - the straw twine was a little tricky to work with.

I started with a regular ole knot then followed the Martha Stewart Living instructions for a quarter inch of chinese staircase. Then I did a few rounds of the chevron pattern. Once I had enough of that, I divided the six strands in two and did two braids. I ended the whole bit with another basic knot, snipped the extra twine, then unwound the strands that made up the tail, so they would be more fluffy.


It was super fun to tinker with friendship bracelets in a fresh new way - so much nostalgia! I'm glad the Martha Stewart Living magazine reminded me of how great these little knots were. Any avid friendship braceleters out there?